Once your
Doberman completely healed edge of cropped ears, and the puppy is no longer
necessary to wear the carcass and saving collar (about the way to protect the seams, we described in the previous article "Cropping ears. Keeping seams"), you may find that the baby’s
ears standing upright as an adult Doberman. This is wonderful!
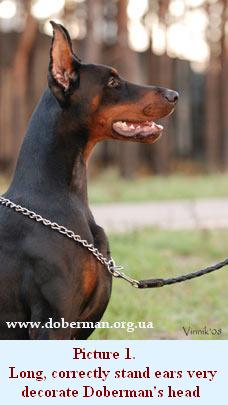
However, we
should not deceive ourselves, the work on the ears on this, as a rule, does not
end. If you leave the ears in a free position, then after some time they will
"weaken" and then completely fall. And all your previous work with
giving the correct position of the ears will be in vain. So it is very important, not allowing the
weakening and, especially, falling ears, proceed to the next step - setting
without carcass.
There are
several ways for further standing ears. In our kennel «Elegant Line» we
practice, so-called "horns".
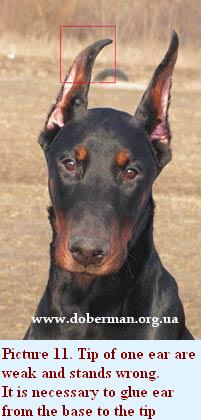
Before
going into gluing ears "in horns", once again, inspect - on the ears
should be no wounds, pimples or redness, docked edge should be completely
healed. In no case did not proceed to the ears sticking up, if you find any of
the factors listed above. Otherwise, any skin damage after a while under the
plaster becomes hard to heal wounds!
So, proceed
to the next step.
You will need:
degreaser
ears (calendula alcoholate or vodka, or etc);
cotton or a
bandage for wiping;
sticking
plaster on a roll width of 2.5-3 cm;
scissors.
Carefully
wipe the inside (without hair) and outer (with wool) ear surface with a cotton
swab dipped in degreaser, wait until it is completely dry.
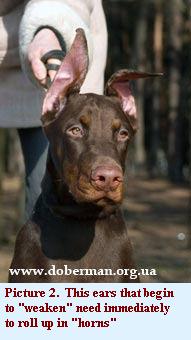
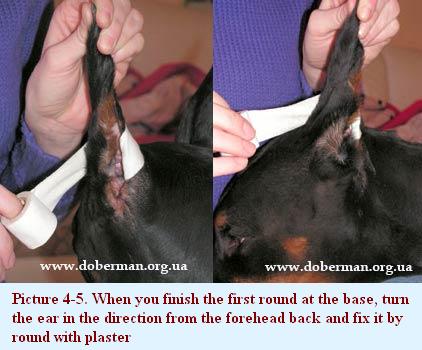
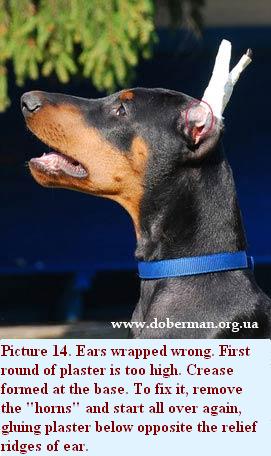
Fix the end
of plaster, gluing it to the inside of the ear opposite the relief ridges.
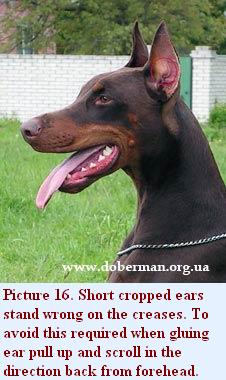
Begin wrapping the plaster around the base of ear (the direction from back to front),
and the ear keep stretched vertically. When you finish the first round at the
base, turn the ear in the direction from the forehead back and fix it by round
with plaster. This prevents turning the ear cartilage from subsidence and
formation crease.
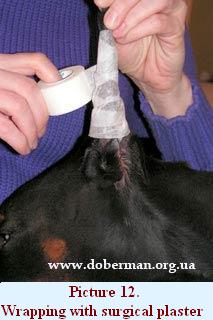
Continue
further spiral stick the plaster over the entire surface of the ear, leaving
unwrapped only 1-1.5 cm of its tip. Repeat the same procedure with the second
ear. If you did everything correctly, the ears will look like a vertical white
horns with protruding up unwrapped tips. Now, at the bottom, connect plaster
strip ears so that they are arranged vertically and parallel to each other.
It is important to choose the right degree of
tension plaster for rolling up ears.
If you
tighten the plaster not enough, it will not give the necessary form ears
vertically standing "horns." All wrapping quickly will slip and ears
will fall. But it is much more dangerous when too tight gluing - it can press
blood vessels and impair circulation.
About tight
wrapping will testify swollen tips of the ears, which we allowed unwrapped in
plaster. Feel ends in 20-30 minutes after the procedure, if they started to
swell and thicken, remove the plaster! Wait until the swelling is completely
come down and repeat the process again, but already some loosening tension.
During the
healing seams puppy already used to manipulating with his ears, so he usually
feel quite comfortable with the process of gluing the ears "in the horns".
Even the "horns", if you did everything right, do not cause any
concern to the puppy.
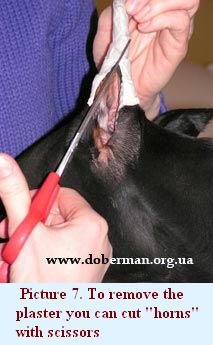
In 4-5 days
it needs to removed gluing to give ears some air and check the condition of the
skin under the plaster. For quickly removing the plasteryou don’t need to unstick his coil by coil.
Take the scissors (scissors tips should not be sharp), get them into the cavity
between the edges of compressed by wrapping ear and from the bottom up
carefully (so as not to injure the puppy) cut the plaster. Now, holding the fur
to prevent it from loosening, gently peel off the plaster.
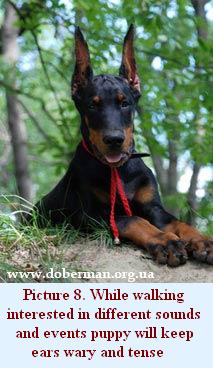
Ears need
to rest, but not for a long time and it is best to do before walk. While
walking interested in different sounds and events puppy will keep ears wary and
tense.
Returning
from a walk, wrap the ears again, starting the process of wrapping from
inspection possible damage the skin surface. If skin doesn’t have any damages or
inflammations wrap the ears again by the scheme described above.
Keep
plaster on ears always dry. If it's the wet weather or the rain, or your puppy
played in pond and the like, the plaster may dampen or wet. It must be replaced
as soon as possible, because otherwise the ears will sweat and steam, and it
will lead to the formation of ulcers and wounds.
Do not tape
the plaster on damage or redness on the skin. This will only aggravate the
situation. However, if left ears in the free state, they can fall and
completely nullify all previous work. What to do in this case?
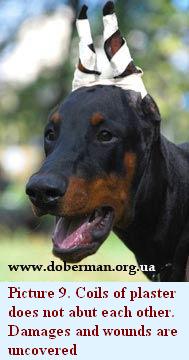
First of
all, deal damage by any disinfectant and a drying agent. If the damage is very
small, assess if you will be able to apply plaster coils, leaving these areas
uncovered. If yes, then wrap "horns" and unwrap wounds to provide air access to
them and be able to handle them.
If not, you
can temporarily use a metal carcass or carcass made from a plastic bottle. In
this case, select a bottle with small diameter, at the bottom make a soft
cushion to protect the puppy's head skin from rubbing (this process is
described in the article "Cropping ears. Keeping seams").
This
carcass is fixing between the ears. Plaster strip glued to the inside of ears (the
one usually does not have wounds) and glued to the upper ends of the bottle.
Need another round of horizontal plaster that will fix a bottle on the head of
a puppy. When the wound is healed, you can return to the previous scheme -
setting by means of the "horns".
As a result
of repeated glue and unstuck plaster puppy’s wool can become significantly rare.
Do not despair, to the time when working with "horns" is completed, ears
will acquire wool again.
In the
process of standing ears you can use more gentle way to do "horns”, but it
requires more skill. In this case you need another surgical plaster width 2.5-3
cm (we use the plaster firm Micropore). This plaster is hypoallergenic and has
a low degree of stickiness, so when you remove it, it almost does not pull out
wool. Moreover, under it ears are able
to "breathe" and less prone to sweat and allergic rashes.
How can
this low stickiness plaster keep on ears?
Begin to
act according to the scheme described above. Inspect and degrease ears. Fix the
end of plaster at the base opposite the relief protrusions 3-4 mm higher than
the previous version, fix it, further holding finger.
Continue to overlay
plaster on the coils of the scrolled up elongated ear.As in the previous case left unwrapped 1-1.5
cm tip, and without clipping plaster, continue downwards to the first round of
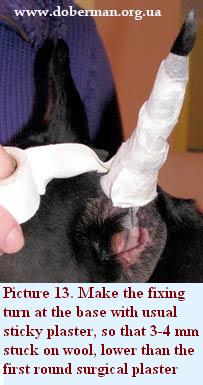
the base, spirally glue second layer. Now plaster pick off.Then we take the usual sticky plaster,do at the base the fixingturn so that 3-4 mm adhesive plaster stuck on
wool, lower than the first round imposed surgical tape, thus providing more
reliable fixation "horns". Of the usual plaster also produce a jumper
between the ears. Do not forget to check after 20-30 minutes the tip of the ear
to make sure that the wound is not too tight.
Wrappedearswithsurgicaltapealsoneedperiodicrest.
Remove it every 4-5 days and
not for long leave the ears ventilated.
Gradually
the time for ventilation should be increased. But once you begin to notice that
the ears begin to wilt and deviate from the vertical position, they will need
to roll up again immediately, without waiting until they finally fall.
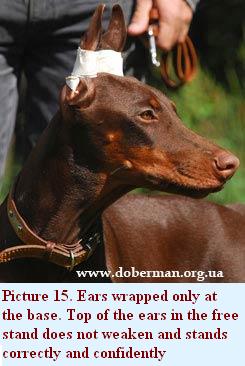
When you
make sure that the top of the ears in the free stand does not weaken and stands
correctly and confidently, you can stop wrapping ears to the top, but only to wrap
up half or only at the base.
Each puppy
has individual duration of standing up ears process. Some puppies enough to do
"horns" for 2-3 weeks, but sometimes you have to glue the ears for
many months.
The
duration of this process is affected by several factors:
-
Competently carried out cropping ears;
- The
thickness and strength of the ear cartilage, and the length of the docked ear
(short cropped ears stand up easier);
- careful
approach and the regular work of the owner over the correct healing and correct
standing the ears;
- Ensuring puppy balanced nutrition, vitamins
and mineral supplements.
Be careful
during the change of teeth, during his puberty or when puppy feel unwell. Even
standing firmly ears at this time may fall. You should immediately roll their
up. Moreover, in this case a few days is usually enough to improve the
situation.
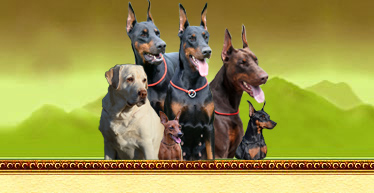
Your
responsible approach and hard work on the standing your pet's ears will
certainly succeed! And all subsequent years superbly standing watchful ears of
your Doberman will give the unique beauty of his head and the whole appearance.
Goodlucktoyou!
In the
article used the photos Vinnik Anna, Morozova Irina, Irina Agura.
Posed for
photos Dobermans from kennel «Elegant Line»